 | ||
| || home ||| units ||||| help | ||
| All Units | > | Unit 7 - Levers and machines | > | Investigation 1 - Levers, pulleys, and inclined planes, Oh My! | > | Trial 1 |
Trial 1 - Lifting Potatoes
-
In order to lift up a heavy object, such as a huge rock, the lever was invented. A lever is a rigid rod or bar that pivots around a fixed point called a fulcrum. When you apply a force on one part of a lever, the lever pivots on the fulcrum and another part of the lever moves an object (or person) on the other part of the lever.
We still use levers today to lift things. For example, a playground seesaw can be used to lift a person. Draw a playground seesaw and identify its fulcrum on your drawing. Refer to Technical Hints to see how to use the drawing tool.

-
There are three different types of
levers.

- First class levers are ones in which the fulcrum is placed between the force and the object or load you want to move. An example includes scissors. You apply a force by squeezing your hand and the load is the paper where the blades are cutting it.
- Second class levers are ones in which the object you want to move is placed between the force and the fulcrum. An example includes a nutcracker.
- Third class levers are ones in which the force is placed between the object you want to move and the fulcrum. An example includes tweezers.
Which type of lever is the seesaw? How do you know?

-
The force sensor is a very interesting device. The force sensor has the ability to measure force either by pushing or pulling on their hook (usually an eye bolt). The hook is connected to a rigid beam inside the force sensor that bends a little when you push or pull. As you pull on the hook, the beam inside the force sensor bends in the direction you are pulling. The electronics inside the sensor converts the amount of bend into a signal sent to the interface where it is converted into a number for the software. When you push the hook the beam bends the other way and the signal is reversed. You can tell whether you push or pull on the hook by the sign of the force displayed. One will be either positive (+) and the other negative (-) on the numeric readout and graph. Try it out. Refer to Technical Hints to connect the force sensor.

-
Every sensor affects measurement in some manner. Therefore, the force sensor should always be zeroed before you run your experiment in order to remove measurement errors associated with the small forces caused by the weight of the hook and the internal beam. Try zeroing your force sensor. Refer to Technical Hints to zero the force sensor. The software will have a button for zeroing the force sensor. In addition most force sensors have a tare button built right into the sensor itself.
-
Start your force sensor. Refer to
Technical Hints to record a single
measurement. Before pushing or pulling on
the hook, does the force now read zero?
Again push and pull on the hook to observe
the force. After several tries, stop and
save your graph. Refer to Technical Hints to save your graph.
-
Now let's try to lift some potatoes (or oranges). Attach a 2.3 kg (5 lb) bag of potatoes to the hook. Zero and start your software. Lift the bag of potatoes straight up. Stop data collection and save your graph. Refer to Technical Hints to save your graph.

-
Tape the center of a pole (lever) to a rolling pin (fulcrum) with duct tape. Place the fulcrum on the upended wastebasket.
-
Load one end of the lever with the bag of potatoes by passing the pole through the top of the potato bag.

-
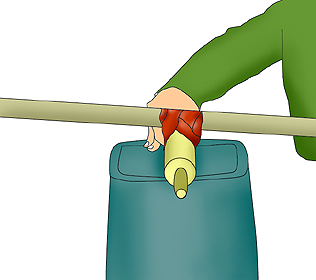
Attach a screw hook to the other end of the pole by twisting the screw end gently into the pole. Hook the force sensor to the screw hook. Make sure the force sensor and the potatoes are about equal distances from the fulcrum.

-
Zero your force sensor. Refer to Technical Hints to zero the force sensor.
-
Start data collection. Refer to
Technical Hints to record a single
measurement. Pull down on the lever (pole)
and note the amount of force required to
lift the potatoes. Stop and save your graph.
Refer to Technical Hints to save your graph. Be
prepared to share your data collection
results with the class.
-
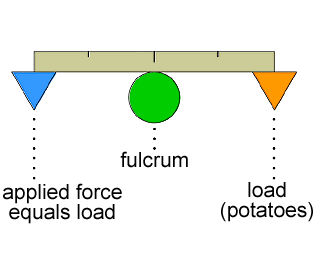
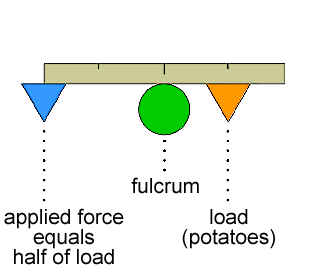
The effort length is the distance from the fulcrum at which you apply a force. Note that in this case the effort length is the same as the load length from the fulcrum.
-
Predict how the amount of force to
raise the potatoes would change if the load
length were less than the effort length from
the fulcrum. Be prepared to share your
prediction with the class.
-
Move the bag of the potatoes halfway between the fulcrum and the end of the pole. Zero your force sensor. Refer to Technical Hints to zero the force sensor.
-
Start data collection. Refer to
Technical Hints to record a single
measurement. Pull down on the lever (pole)
and note the amount of force required to
lift the potatoes. Stop and save your data.
Refer to Technical Hints to save your graph.
-
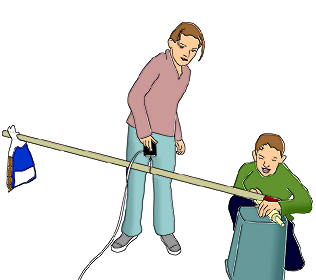
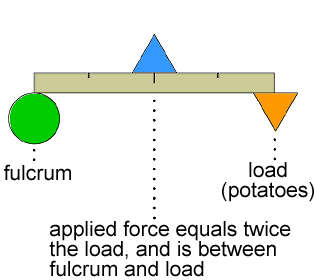
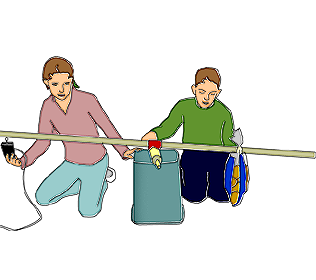
Up to now you have been making only first class levers. Remember, a first class lever is one in which the fulcrum is placed between the force and the object or load you want to move. Now, let's make a second class lever, one in which the object you want to move is placed between the force and the fulcrum. Place the fulcrum to one end of the lever. Place the load (potatoes) halfway along the lever. Have another student pull upward on the other end.

-
Predict the amount of force needed
to lift the potatoes. Explain your
prediction.
-
Zero your force sensor. Refer to Technical Hints to zero the force sensor.
-
Start data collection. Refer to
Technical Hints to record a single
measurement. Pull up on the lever (pole) and
note the amount of force required to lift
the potatoes. Stop and save your data. Refer
to Technical Hints to save
your graph. Be prepared to share your data
collection with the class.
-
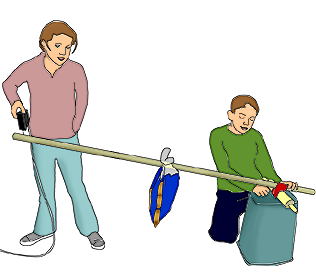
Finally, let's make a third class lever, one in which the force is placed between the object you want to move and the fulcrum. Move the load to the end of the lever. You will pull up on the force sensor at its midpoint.
-
Zero your force sensor. Refer to Technical Hints to zero the force sensor.
-
Start data collection. Refer to
Technical Hints to record a single
measurement. Pull down on the lever (pole)
and note the amount of force required to
lift the potatoes. Stop and save your data.
Refer to Technical Hints to save your graph. Be
prepared to share your data collection
results with the class.
 |  |  |
Copyright 2005 The Concord Consortium, All rights reserved.